
Step-by-Step Guide to Setting Up a Private OCI Helm Repository with Argo CD, GitOps, Docker, GitLab, and Harbor
Note: When you start looking into this topic, you’ll come across countless GitHub issues with various solutions. Some work, some don’t. At first, we were confused by the many conflicting recommendations, so we decided to create a clean and reliable setup for different private Helm repositories. We = Alexander Hoeft, Philip Siemer, Daniel Schlosser and Artem Lajko
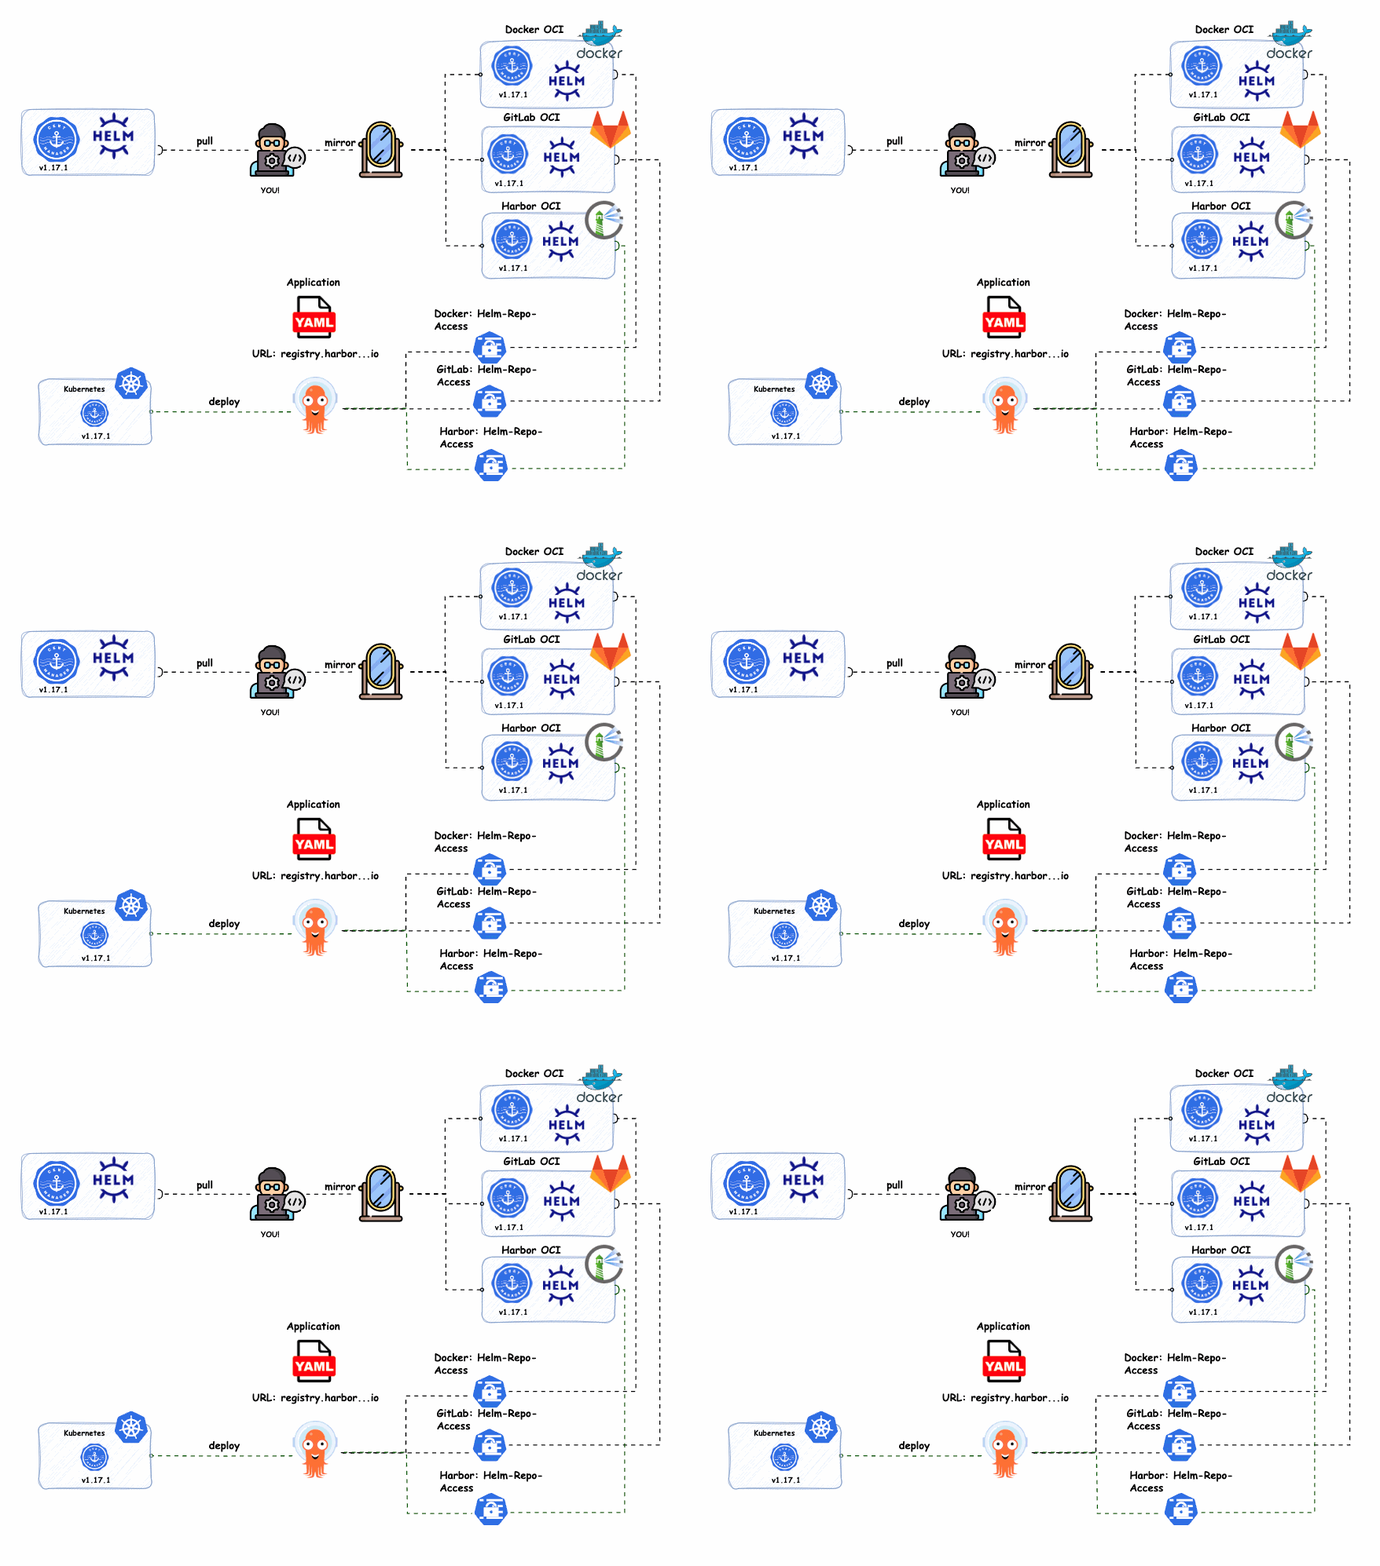
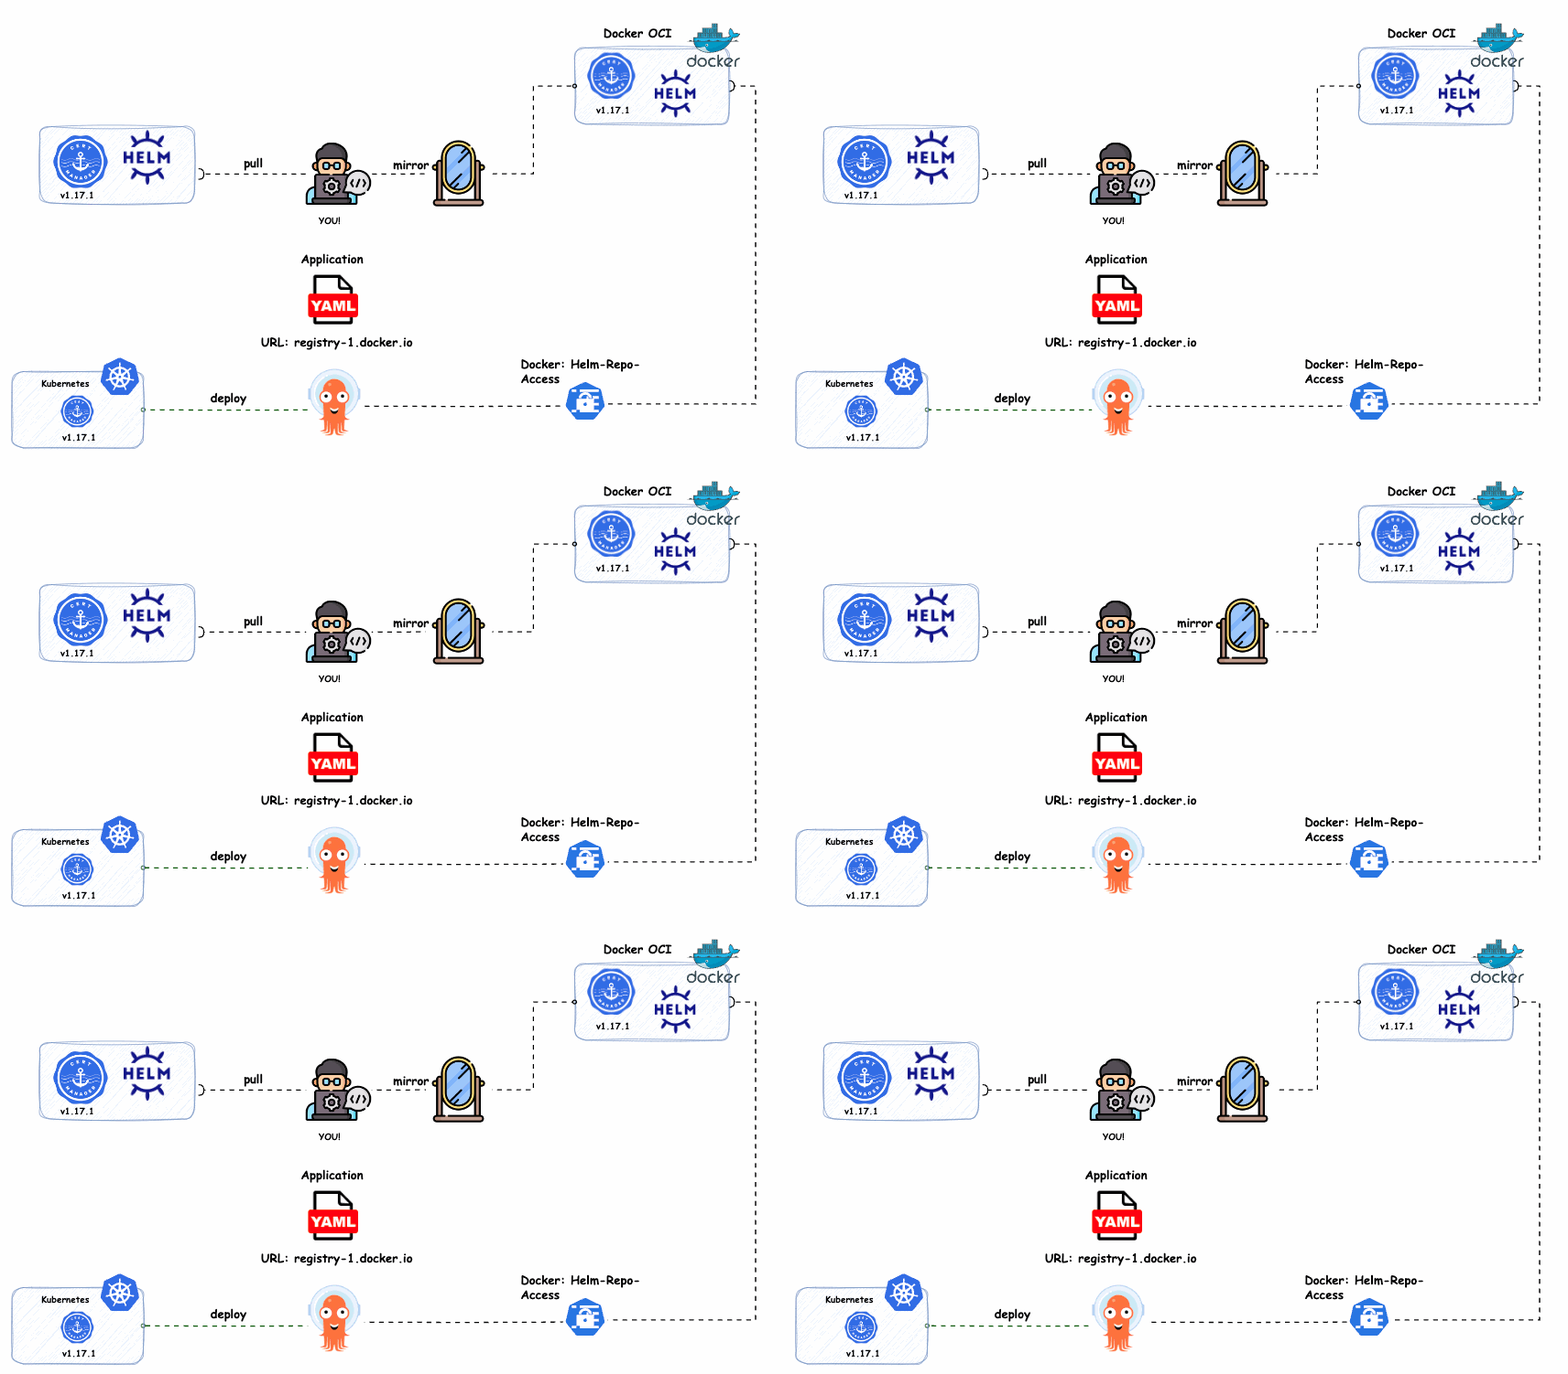
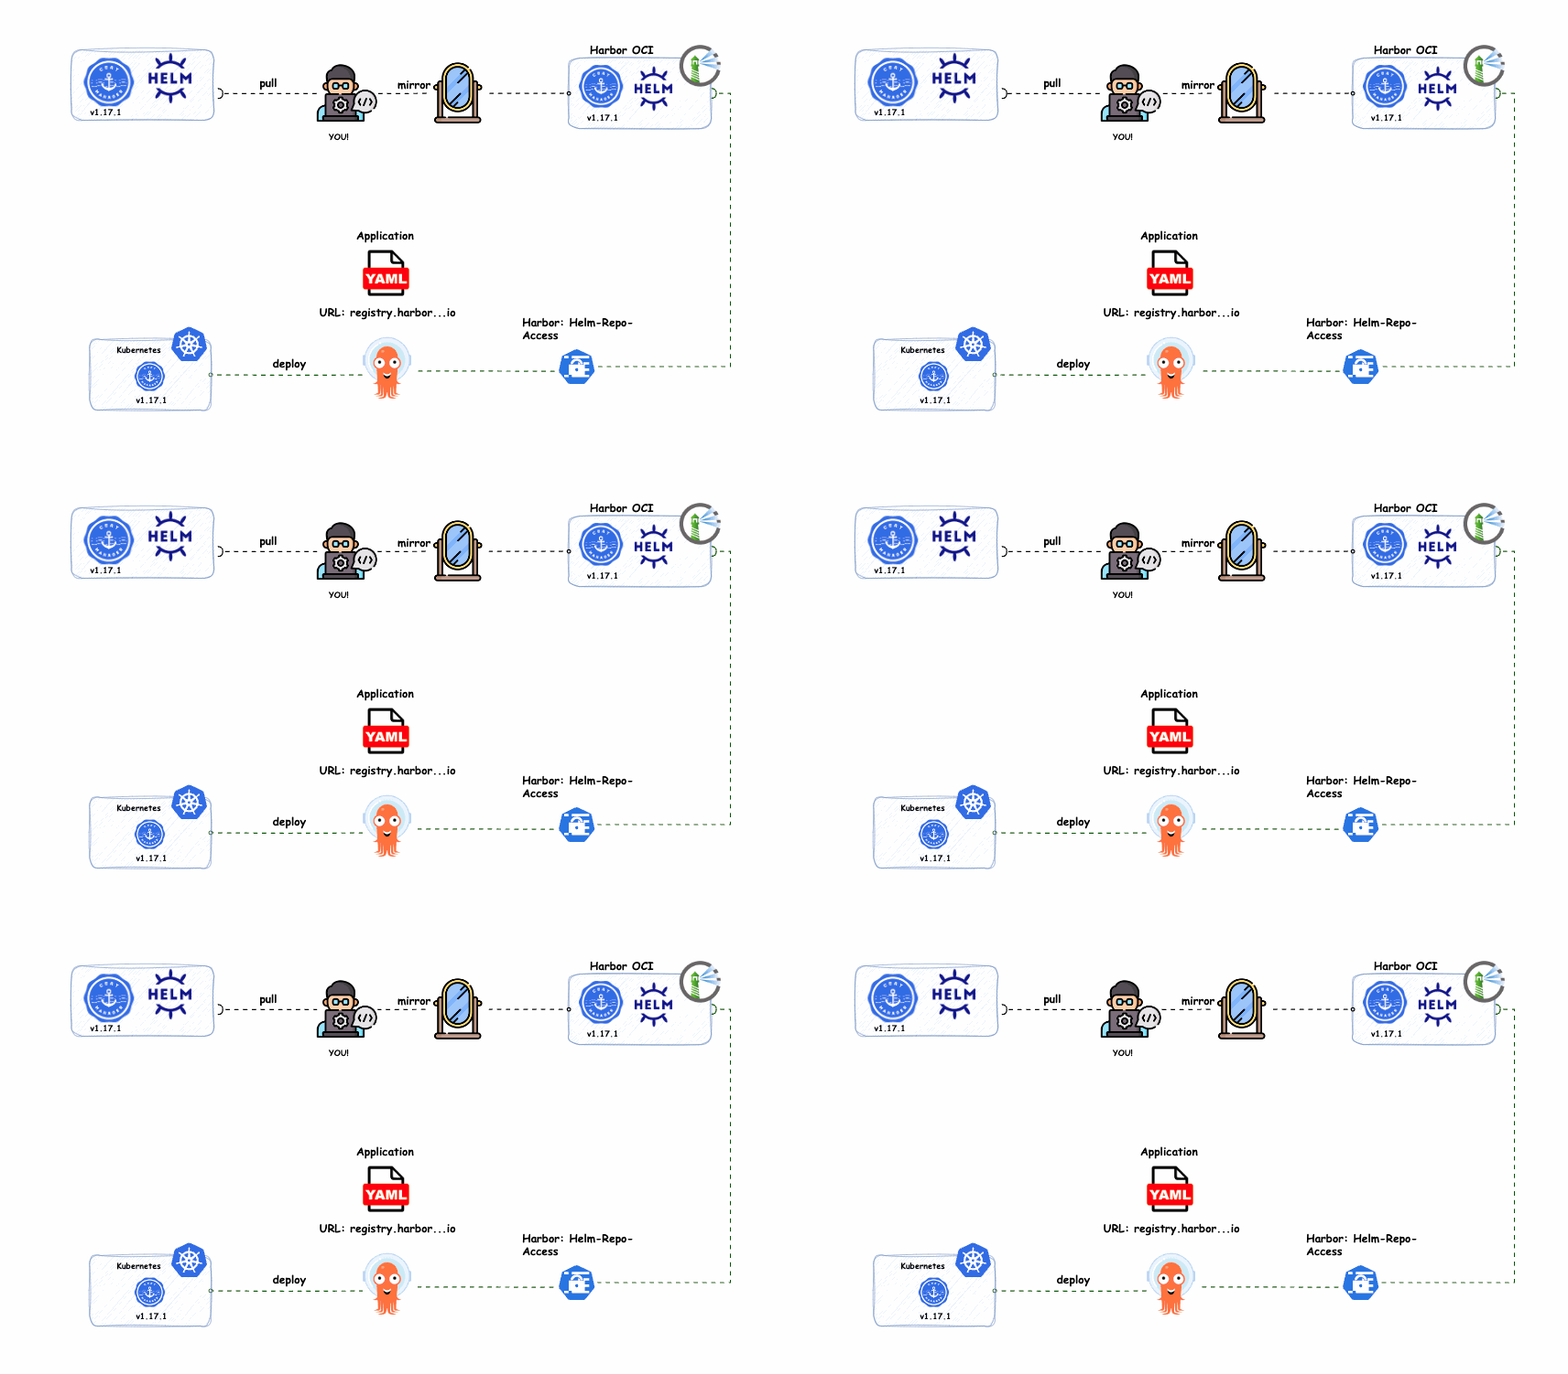
There are various scenarios where you might need more than just hosting your own Helm charts in a private registry. For example, you may need to mirror and sign Helm charts before making them available in a private repository. This private registry is often used by different customers to deploy signed Helm charts on their respective clusters. In many cases, these clusters don’t have internet access, or policies (e.g., Kyverno) restrict pulling images only from specific Helm chart repositories.
Starting April 1, 2025, Docker will introduce new pull rate limits:
- Unauthenticated users: 10 pulls per hour
- Authenticated users (free account): 100 pulls per hour
- Pro, Team, and Business subscribers: Unlimited pulls (with fair use)
Container image mirroring and Helm chart signing are essential best practices. With Docker’s new pull rate limits, private repositories are now more critical than ever.
Alright, enough theory — let’s dive into the hands-on part and see how to set up private OCI Helm repositories across different platforms!
Difference Between a Private Helm Repository and a Private OCI Helm Repository
When working with Argo CD, there are key differences between a Helm private repository and a Helm OCI private repository. The distinction isn’t just about the protocol — it also affects how Argo CD integrates these repositories and how secrets need to be configured.
For this guide, we’ll focus exclusively on OCI-based repositories, as we consider OCI the industry standard. OCI support has been available since Helm 3.8.0, making it the preferred approach moving forward.
This how you configure it in the Argo CD GUI. Go to Settings -> Repositories and hit + CONNECT RREPO.
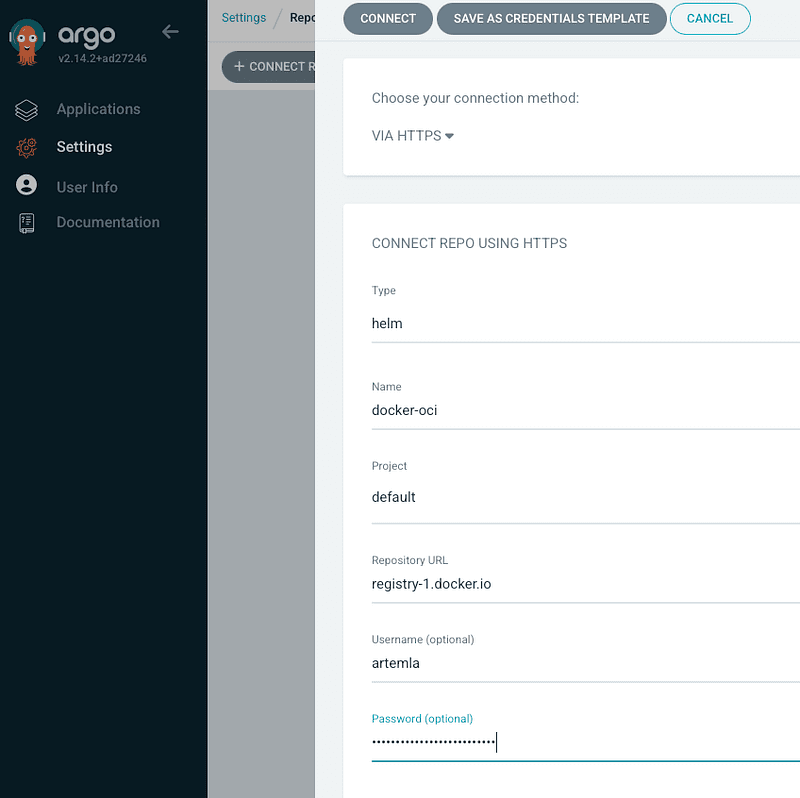
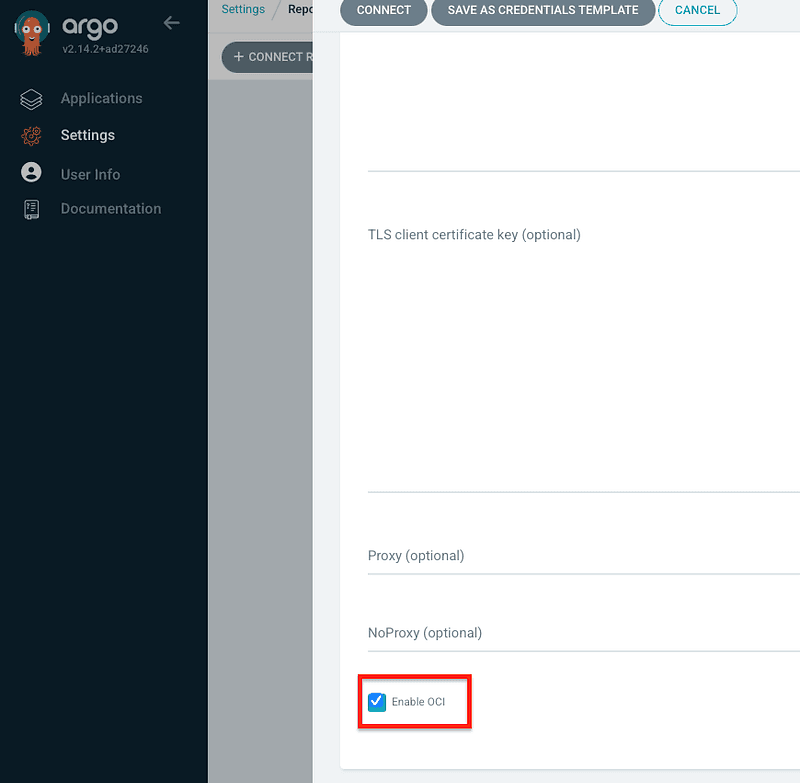
Don’t forget to enable OCI!
When using an OCI-enabled Helm repository, the secret in Argo CD looks like this:
apiVersion: v1
data:
  enableOCI: dHJ1ZQ==
  name: ZG9ja2VyLW9jaQ==
  password: Z.....
  project: ZGVmYXVsdA==
  type: aGVsbQ==
  url: cmVnaXN0cnktMS5kb2NrZXIuaW8= (registry-1.docker.io)
  username: YXJ0ZW1sYQ==
kind: Secret
metadata:
  annotations:
    managed-by: argocd.argoproj.io
  labels:
    argocd.argoproj.io/secret-type: repository
  name: repo-2984550025
  namespace: argocd
type: Opaque
What’s Different About OCI in Argo CD?
- No Protocol Prefix (oci://) Needed:
- Unlike traditional Helm repositories (htttps), you don’t manually specify the oci:// protocol in Argo CD.
- Argo CD automatically applies this when working with OCI-based registries.
2. URL Structure (No Repository Path):
- The URL field only contains the registry address (e.g., registry-1.docker.io).
- You don’t include the repository path (e.g., /artemla/cert-manager).
- This is important — see the Docker section below for more details.
Our Setup
We’ve tested and validated this setup with:
- Argo CD Version:v2.14.3
- Argo CD Helm Chart Version:7.8.7
- Helm CLI Version:v3.17.0
Additionally, we’ve confirmed compatibility with older versions of both Argo CD and Helm.
Now that we understand the differences, let’s move on to the actual setup!
Docker OCI: Setting Up a Private OCI Helm Repository with Argo CD
In this section, we’ll go through the full process of:
- Creating a Personal Access Token (PAT) in Docker Hub.
- Pulling the Cert-Manager v1.17.1 Helm chart from Jetstack.io.
- Pushing the chart to a private Docker Helm OCI registry.
- Integrating it into Argo CD and deploying an application from the private repository.
Step 1: Generate a Personal Access Token (PAT) in Docker Hub
First, navigate to Docker Hub and create a Personal Access Token (PAT).
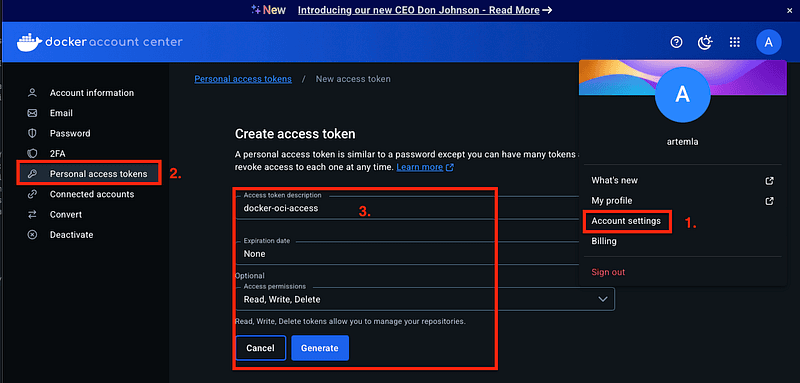
Copy the login command with your PAT and execute it locally:
docker login -u artemla

Password:
Login Succeeded
Step 2: Pull the Cert-Manager Helm Chart from Jetstack
Now, let’s pull the Cert-Manager v1.17.1 Helm chart:
helm pull --version 1.17.1 --repo https://charts.jetstack.io cert-managerAfter running this, you should see the Helm chart package in your directory:
ls
cert-manager-v1.17.1.tgz
Step 3: Push the Helm Chart to a Private Docker Helm OCI Repository
Now, we push the Helm chart to our private Docker OCI registry:
helm push cert-manager-v1.17.1.tgz oci://registry-1.docker.io/artemlaImportant Notes
– You only specify the registry (artemla), not the full path (/artemla/cert-manager).
– The chart name is automatically extracted from its metadata, so Docker will create the correct repository structure.
Check if the push was successful by looking at the Docker UI:
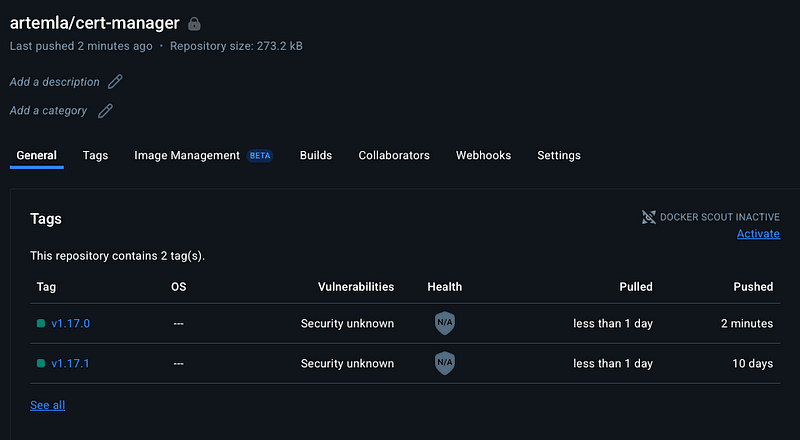
or by running:
helm pull oci://registry-1.docker.io/artemla/cert-manager --version v1.17.1Make sure to set your repository to private under Docker Hub repository settings!
Step 4: Add the Private Docker OCI Helm Repository to Argo CD
4.1 Add via Argo CD UI
- Navigate to Argo CD → Settings → Repositories.
- Click + CONNECT REPO and enter the following details:
- URL:registry-1.docker.io (⚠️ No /artemla at the end)
- Enable OCI: (Make sure to check this option)
3. Click CONNECT.
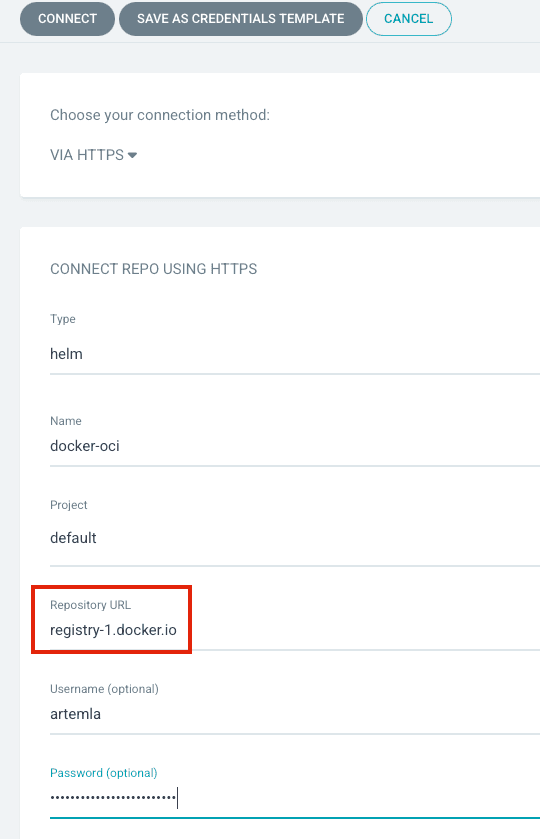
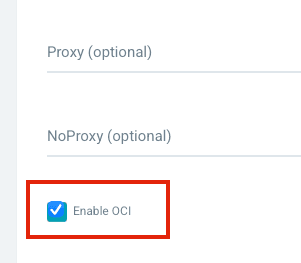
Now you should see something like this:

4.2 Add via CLI (Imperative Approach)
Alternatively, you can add the repository using kubectl by creating a Kubernetes Secret:
apiVersion: v1
data:
  enableOCI: dHJ1ZQ==
  name: ZG9ja2VyLW9jaQ==
  password: ZG.......
  project: ZGVmYXVsdA==
  type: aGVsbQ==
  url: cmVnaXN0cnktMS5kb2NrZXIuaW8=
  username: YXJ0ZW1sYQ==
kind: Secret
metadata:
  annotations:
    managed-by: argocd.argoproj.io
  labels:
    argocd.argoproj.io/secret-type: repository
  name: repo-2984550025
  namespace: argocd
type: Opaque
For a declarative approach, we recommend using External Secrets Operator or Sealed Secrets for secret management.
Step 5: Deploy Cert-Manager from the Private OCI Repository in Argo CD GUI
- Navigate to Argo CD → Applications.
- Click + NEW APP and fill in the form as follows:
- Repository URL:registry-1.docker.io
- Chart Name:artemla/cert-manager
- Version:v1.17.1
3. Click CREATE.
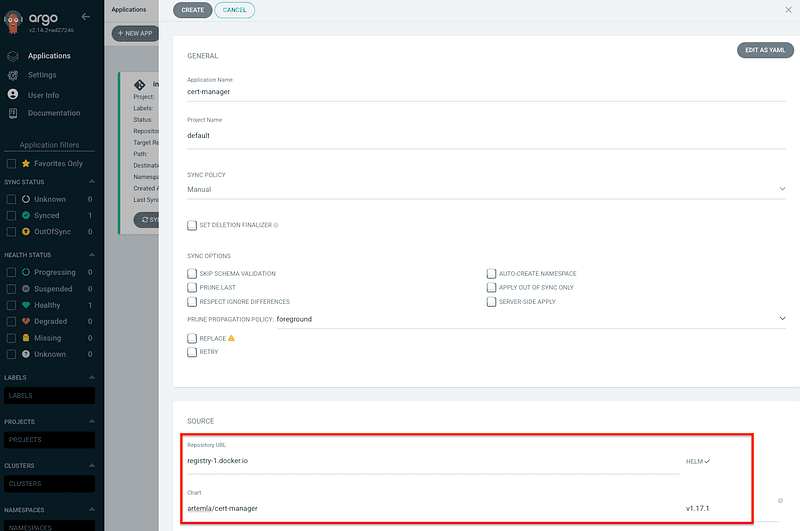
Argo CD should now show an “OutOfSync” status, meaning it can successfully pull the Helm chart from your private OCI registry.
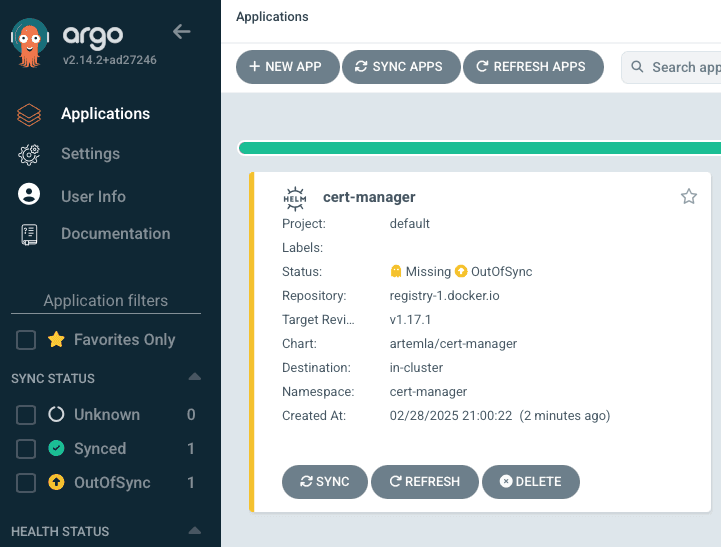
Application YAML Example
This is what the corresponding Argo CD Application YAML looks like:
apiVersion: argoproj.io/v1alpha1
kind: Application
metadata:
  name: cert-manager
  namespace: argocd
spec:
  destination:
    namespace: cert-manager
    server: https://kubernetes.default.svc
  project: default
  source:
    chart: artemla/cert-manager
    repoURL: registry-1.docker.io
    targetRevision: v1.17.1
  sourceType: Helm
This works for both ApplicationSets and Umbrella Charts.
No need for the passCredentials parameter when using OCI repositories.
Step 6 (Optional): Deploying with ApplicationSets and an Umbrella Helm Chart
For dynamic deployments, you can use ApplicationSets with a Cluster Generator:
apiVersion: argoproj.io/v1alpha1
kind: ApplicationSet
metadata:
  name: cert-manager
  namespace: argocd
spec:
  generators:
    - clusters:
        selector:
          matchLabels:
            cert-manager: enabled
        values:
          branch: main
  template:
    metadata:
      name: "{{name}}-cert-manager"
      annotations:
        argocd.argoproj.io/manifest-generate-paths: ".;.."

    spec:
      project: default
      sources:
        - repoURL: https://......
          path: "./cert-manager"
          targetRevision: "{{values.branch}}"

      destination:
        name: "{{name}}"
        namespace: "cert-manager"
      syncPolicy:
        syncOptions:
          - CreateNamespace=false
          - PruneLast=true
Or, if you’re working with Umbrella Helm Charts, here’s how you define it:
apiVersion: v2
name: cert-manager
description: Umbrella Chart for cert-manager
type: application
version: 0.0.1
dependencies:
  - name: artemla/cert-manager
    version: v1.17.1
    repository: "oci://registry-1.docker.io"
Next Up: Setting Up a Private OCI Helm Repository with GitLab
Now that we’ve successfully set up a private OCI Helm repository using Docker, in the next section, we’ll explore how to do the same with GitLab.
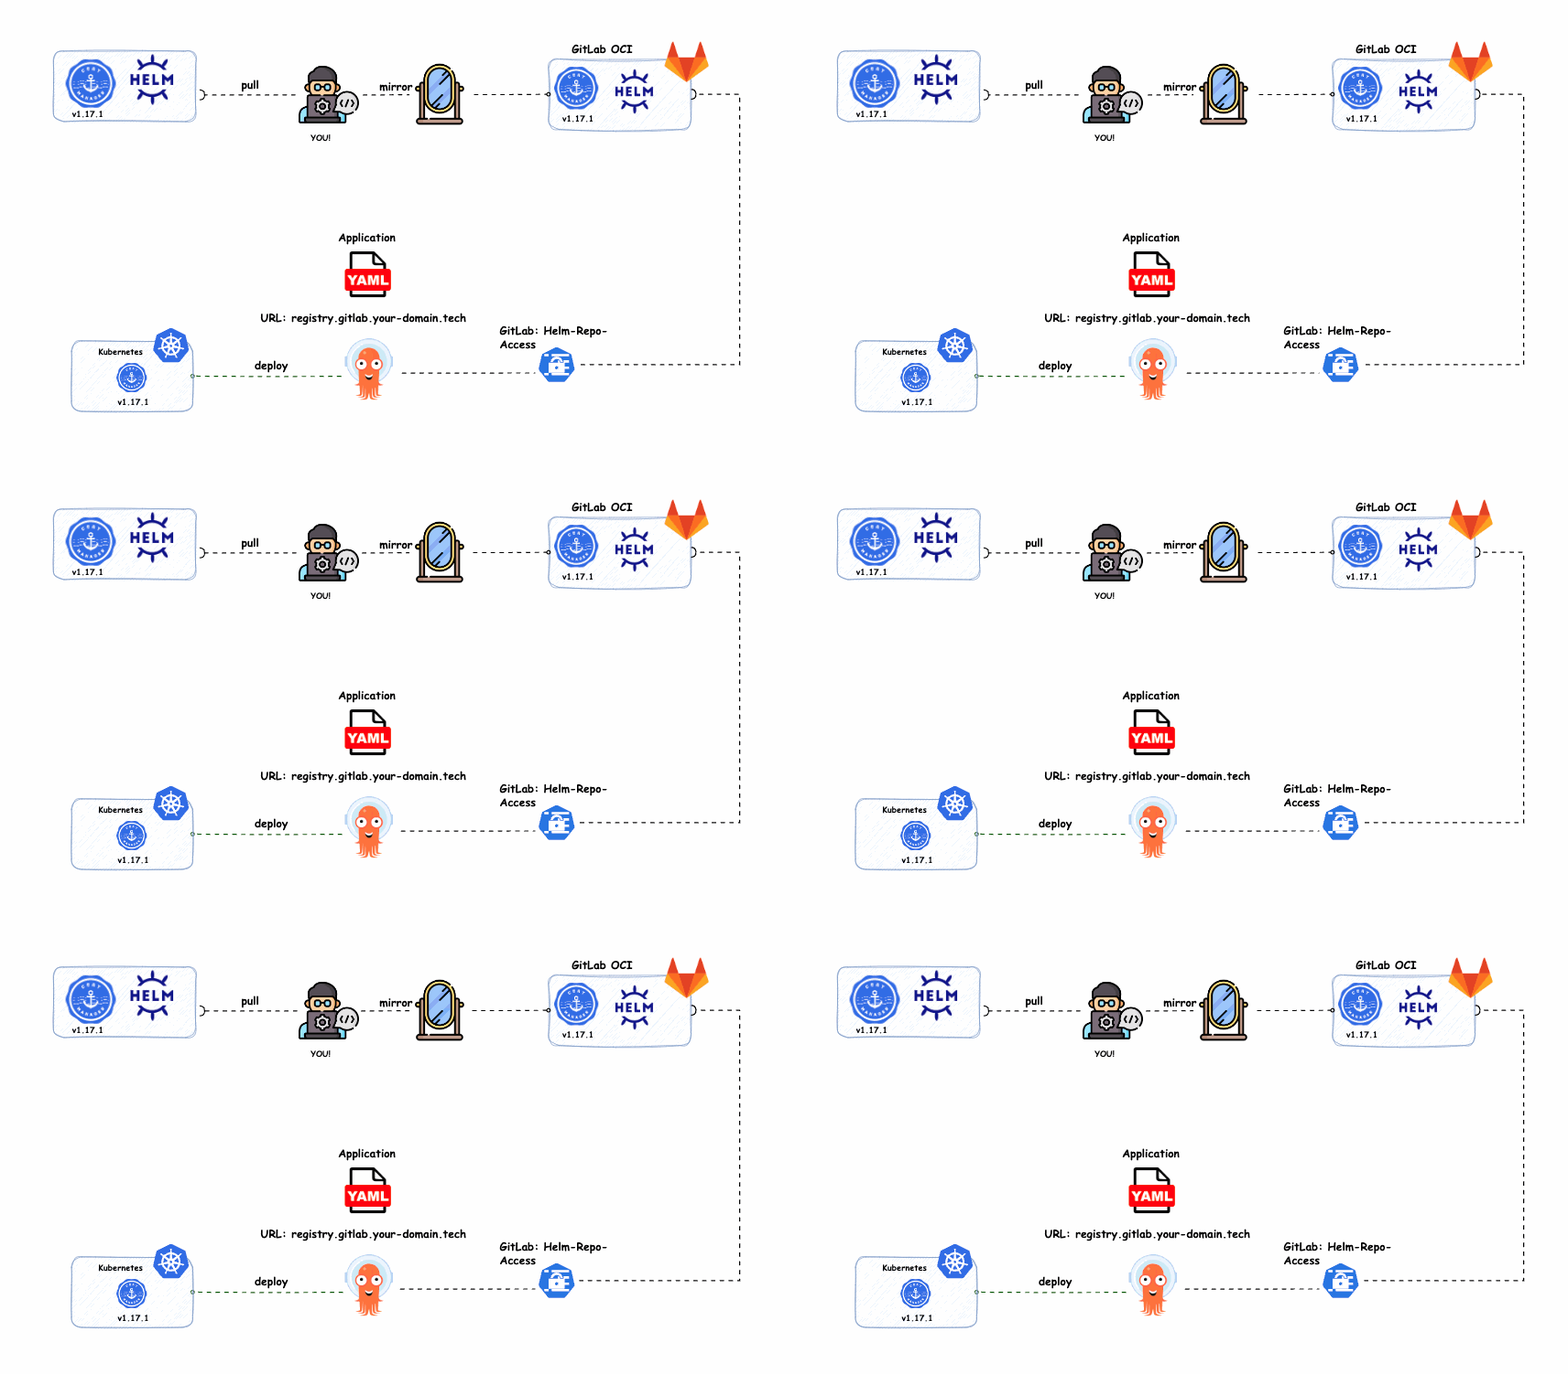
GitLab OCI: Setting Up a Private OCI Helm Repository with Argo CD
In this section, we will:
- Create an Access Token for a GitLab repository.
- Pull the Cert-Manager v1.17.1 Helm chart from Jetstack.io.
- Push the chart to a private GitLab Helm OCI registry.
- Integrate it into Argo CD and deploy an application from the private repository.
Step 1: Create a GitLab Access Token
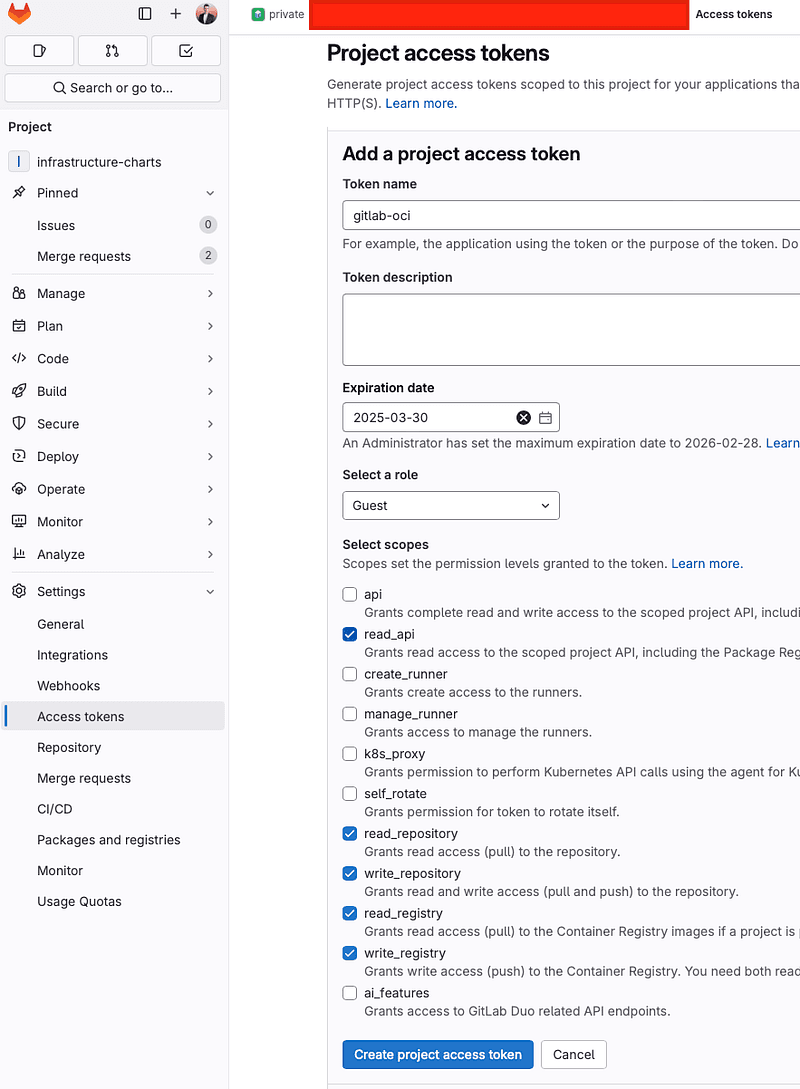
Navigate to GitLab or your self-hosted GitLab instance.
- Go to Settings → Access Tokens in your repository.
- Create a Project Access Token with the necessary permissions.
like:
Step 2: Pull the Cert-Manager Helm Chart from GitHub
Run the following command to pull the Cert-Manager v1.17.1 Helm chart:
helm pull --version 1.17.1 --repo https://charts.jetstack.io cert-managerAfter execution, verify that the chart package is in your directory:
ls
cert-manager-v1.17.1.tgz
Step 3: Log in and Push the Helm Chart to a Private GitLab OCI Registry
Log in to the GitLab registry using the access token and push the Helm chart to the private GitLab OCI repository::
helm registry login registry.gitlab.your-domain.tech --username git
....

helm push cert-manager-v1.17.1.tgz oci://registry.gitlab.your-domain.tech/private/infrastructure-charts
To confirm the push was successful, try pulling the chart:
helm pull oci://registry.gitlab.your-domain.tech/private/infrastructure-charts/cert-manager --version v1.17.1Step 4: Add the Private GitLab OCI Helm Repository to Argo CD
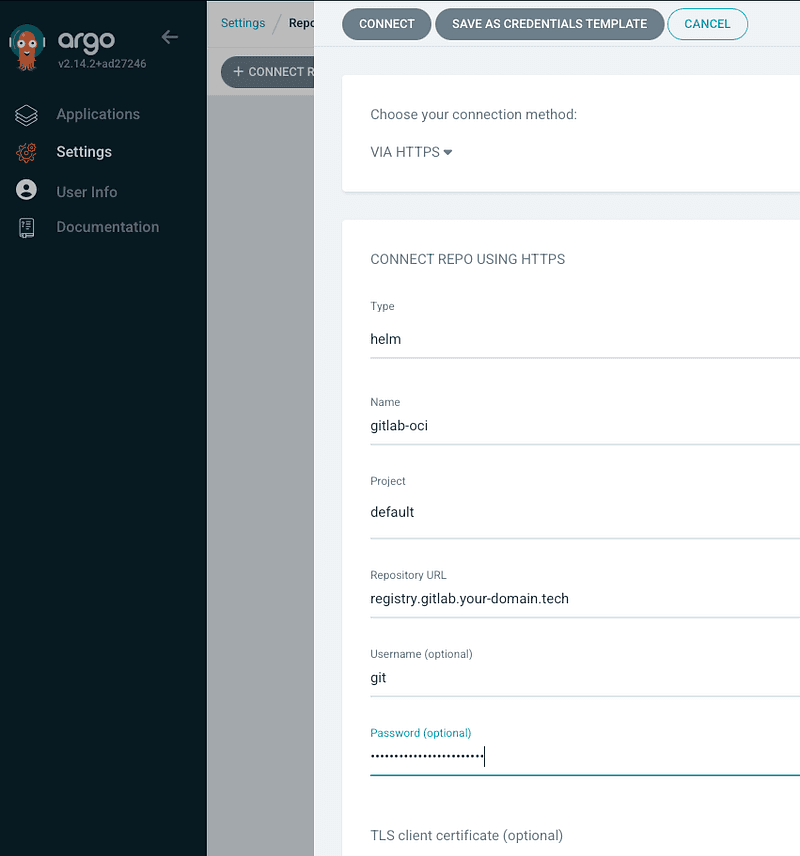
4.1 Add via Argo CD UI
- Navigate to Argo CD → Settings → Repositories.
- Click + CONNECT REPO and enter the following details:
- URL:
registry.gitlab.your-domain.tech - Enable OCI: Make sure this option is checked.
3. Click CONNECT.
4.2 Add via CLI (Imperative Approach)
You can also add the repository using kubectl by creating a Kubernetes Secret:
apiVersion: v1
data:
  enableOCI: dHJ1ZQ==
  name: aWl0cy1vY2k=
  password: Z.....
  project: ZGVmYXVsdA==
  type: aGVsbQ==
  url: c.....
  username: Z2l0
kind: Secret
metadata:
  annotations:
    managed-by: argocd.argoproj.io
  labels:
    argocd.argoproj.io/secret-type: repository
  name: repo-1906426995
  namespace: argocd
type: Opaque
For a declarative setup, it is recommended to use External Secrets Operator or Sealed Secrets for secret management.
Step 5: Deploy Cert-Manager from the Private OCI Repository in Argo CD
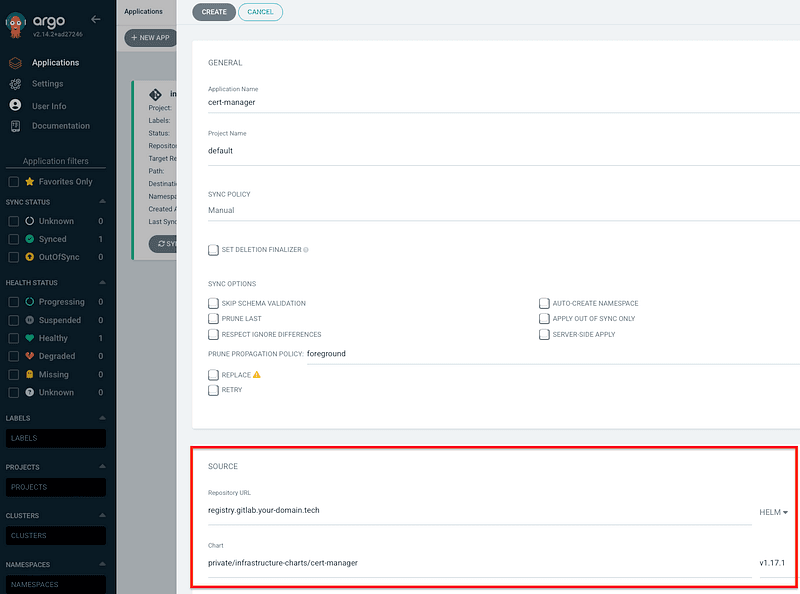
- Navigate to Argo CD → Applications.
- Click + NEW APP and fill in the form as follows:
- Repository URL:
registry.gitlab.your-domain.tech - Chart Name:private/infrastructure-charts/cert-manager
- Version:v1.17.1
3. Click CREATE.
Argo CD should now show an “OutOfSync” status, indicating it successfully retrieved the Helm chart from the private OCI registry.
Application YAML Example
This is what the corresponding Argo CD Application YAML looks like:
apiVersion: argoproj.io/v1alpha1
kind: Application
metadata:
  name: cert-manager
  namespace: argocd
spec:
  destination:
    namespace: cert-manager
    server: https://kubernetes.default.svc
  project: default
  source:
    chart: private/infrastructure-charts/cert-manager
    repoURL: registry.gitlab.iits.tech
    targetRevision: v1.17.1
Next: Setting Up a Private OCI Helm Repository with Harbor
Now that we have successfully configured a private OCI Helm repository using GitLab, the next section will focus on Harbor.
Harbor OCI: Setting Up a Private OCI Helm Repository with Argo CD
In this section, we will:
- Create a Robot Account in Harbor.
- Pull the Cert-Manager v1.17.1 Helm chart from Jetstack.
- Push the chart to a private Harbor OCI registry.
- Integrate it into Argo CD and deploy an application from the private repository.
Step 1: Create a Robot Account in Harbor
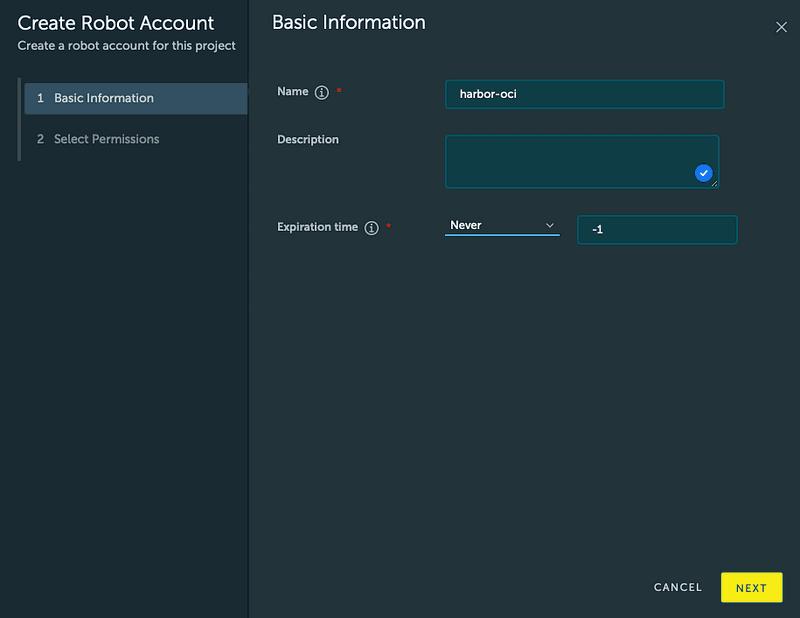
- Open the Harbor UI and navigate to your project.
- Select Robot Accounts and create a new access token.
- Assign the necessary permissions, such as create, delete, list, and update for repositories.
Like:

Step 2: Pull the Cert-Manager Helm Chart from Jetstack
Download the Cert-Manager v1.17.1 Helm chart using Helm:
helm pull --version 1.17.1 --repo https://charts.jetstack.io cert-managerAfter the command executes, confirm that the Helm chart is in your directory:
ls
cert-manager-v1.17.1.tgz
Step 3: Log in and Push the Helm Chart to a Private Harbor OCI Registry
Log in to your Harbor registry using the Robot Account credentials and push the Helm chart to the private Harbor OCI repository::
helm registry login  registry.your-domain.cloud/projectname --username 'robot$project-harbor-oci..'
....

helm push cert-manager-v1.17.1.tgz oci://registry.your-domain.cloud/projectname
To verify the push, try pulling the chart:
helm pull oci://registry.your-domain.cloud/projectname/cert-manager --version v1.17.1Step 4: Add the Private Harbor OCI Helm Repository to Argo CD
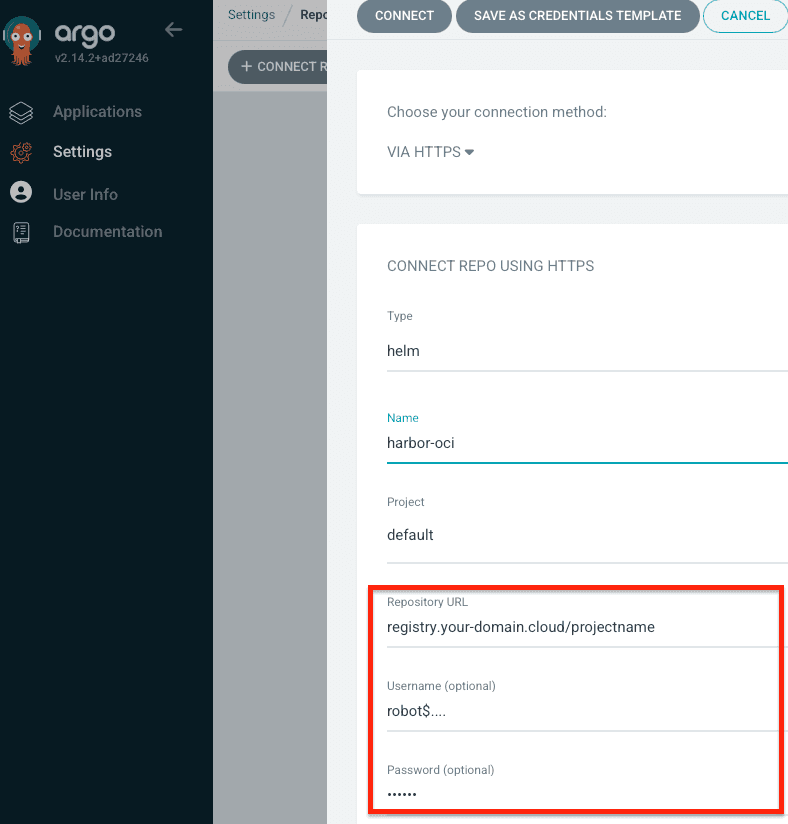
4.1 Add via Argo CD UI
- Navigate to Argo CD → Settings → Repositories.
- Click + CONNECT REPO and enter the following details:
- URL:
registry.your-domain.cloud/projectname - Enable OCI: Make sure this option is checked.
3. Click CONNECT.
Unlike Docker and GitLab, the project name is included in the URL.
4.2 Add via CLI (Imperative Approach)
You can also add the repository using kubectl by creating a Kubernetes Secret:
apiVersion: v1
data:
  enableOCI: dHJ1ZQ==....
  name: b2NpL.....
  password: Mk
  project: ZGVmYXVsdA==
  type: aGVsbQ==....
  url: cmVn
  username: cm9ib3Qkc....
kind: Secret
metadata:
  annotations:
    managed-by: argocd.argoproj.io
  labels:
    argocd.argoproj.io/secret-type: repository
  name: repo-1876401384
  namespace: argocd
type: Opaque
For a declarative setup, it is recommended to use External Secrets Operator or Sealed Secrets for secret management.
Step 5: Deploy Cert-Manager from the Private OCI Repository in Argo CD
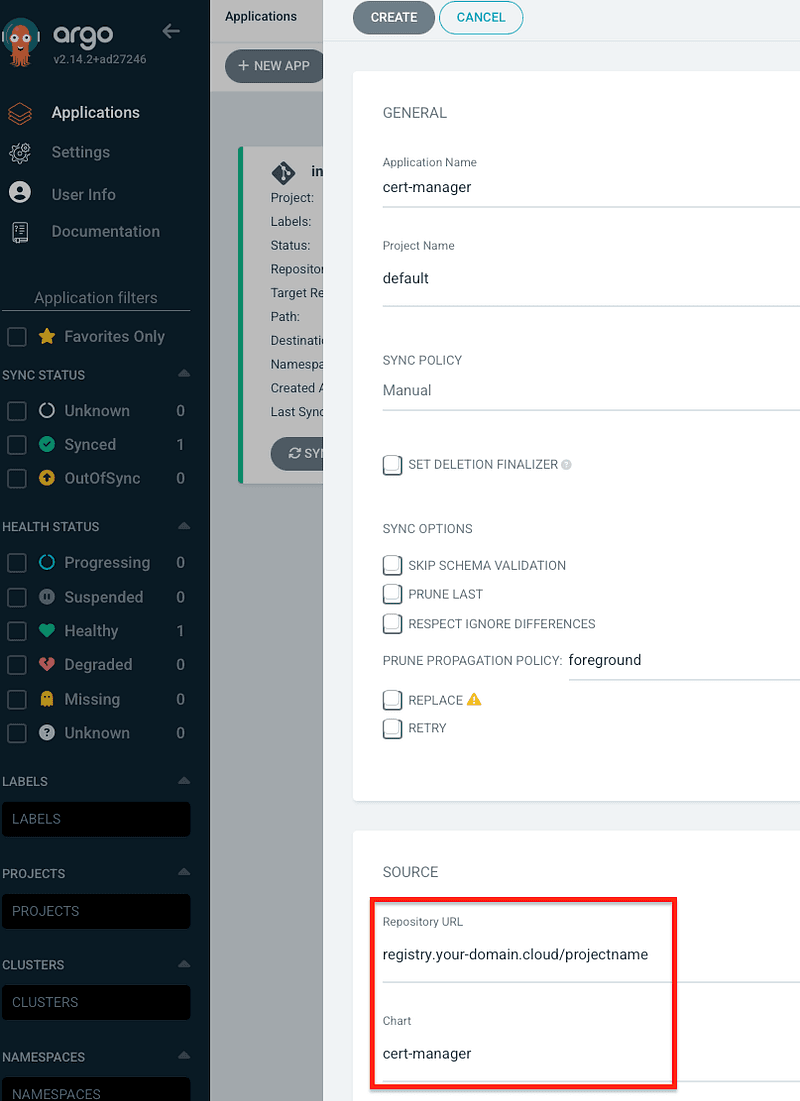
- Navigate to Argo CD → Applications.
- Click + NEW APP and fill in the form as follows:
- Repository URL:registry.your-domain.cloud/projectname
- Chart Name:cert-manager
- Version:v1.17.1
3. Click CREATE.
Unlike Docker or GitLab, in Harbor, the project name is explicitly included in the repository path. You just need add the Chart like:
Application YAML Example
This is what the corresponding Argo CD Application YAML looks like:
apiVersion: argoproj.io/v1alpha1
kind: Application
metadata:
  name: cert-manager
  namespace: argocd
spec:
  destination:
    namespace: cert-manager
    server: https://kubernetes.default.svc
  project: default
  source:
    chart: cert-manager
    repoURL: registry.your-domain.cloud/projectname
    targetRevision: v1.17.1
Final Thoughts
This guide covers how to set up private OCI Helm repositories in Docker, GitLab, and Harbor for Argo CD deployments.
By following this guide, your Argo CD Private OCI Helm Repository Setup will be optimized for security, automation, and scalability.
All examples work with Applications, ApplicationSets, and Umbrella Helm Charts.
For self-hosted projects, we personally recommend Harbor or GitLab as OCI registries.
This should help regardless of which private OCI registry you choose.
Thank You!
This blog post wouldn’t have been possible without the contributions and expertise of the following people:
Authors:
Engineering Support:
- Philip Siemer
- Daniel Schlosser
A huge thank you to everyone involved in making this guide as clear, practical, and valuable as possible!
Visit our other blogs!
FAQs:
- What is the difference between a Helm repository and an OCI Helm repository?
- How do I configure a private Helm chart repository in Argo CD?
- Why should I use OCI Helm repositories instead of traditional Helm repositories?
Über den Autor
A public speaker and a Senior Platform Engineer at iits-consulting. He specializes in GitOps and scaling Kubernetes platforms, with deep hands-on experience. A passionate advocate for open source, Alexander is particularly known for his expertise with Argo CD and for building reliable, secure, and scalable cloud architectures. On stage and in practice, he bridges strategy and engineering, helping teams adopt modern platform patterns and operate cloud-native systems with confidence.